Tuesday, November 29, 2011

e36 M3 Front Suspension Overhaul Part IV: 96+ M3 Strut Mounts, Sway Bar Links, X-Brace Install

So the final chapter to the suspension overhaul includes swapping out the strut mounts for reversed 96+ M3 mounts. Throwing the sway bar back on with new sway bar links and installing a new x-brace.

A little background information. The 95 M3 strut mounts and 96-99 M3 strut mounts are different. The 95 M3 is offset for more caster but is centered for no camber change. The 96 M3 is offset for the same reasons, but is also offset side to side so when you switch the left side to the right you get -2.5º camber!

Having about 0º camber and tearing up the outside of my front tires, I decided to give this cheap mod a try. Here is a comparison of the two mounts. The 96-99 on the left and the 95 on the right. The 96-99 mount also seems to be reinforced a little better. The red stuff is grease.

96-99 M3 Left vs 95 M3 right
And here is the difference once installed. I got an alignment afterwards and my camber was at -2.6º. Maybe not great for street but getting better for track. I've read -3.5º for track in the front is optimal.

95 M3 Mount

96-99 M3 Mount

96-99 M3 Mount
While I was down there I decided now would be a good time to buy and install and x-brace. If you have an M3 you should already have the threaded nut-serts installed in the subframe. You basically only need 4 screws for that and 2 screws for the rear mounting points. There is a write-up on understeer.com which I followed, but isn't really necessary if you have an M3.


Last thing to do was re-install the sway bar and replace the sway bar links. I went with Meyle HD. I typically wouldn't really rock Meyle, but the HD parts seem to hold up well.


They use an internal hex thread like the struts to immobilize them as they start to spin when you torque them down. I don't know if this is better or worse than the Lemforeder brand since it's easy to strip out an internal hex thread.

Impressions so far are pretty intense. The solid mounts in the engine and tranny make the car "roar" throughout the powerband. It's actually somewhat quiet at idle not much NVH. But upon acceleration it sounds like a race car would inside the cabin. Heel toe and downshifting are really nice and off/on acceleration is super responsive.

The delrin control arm bushings with the z3 rack make the car pretty darty. I'm not totally used to the setup and we'll see how it fairs on the track. I can't really feel the camber yet, will be more for track. Also I'm not sure where the x-brace improved handling yet since so much was changed at one time. Feels solid that's for sure. The knock is definitely gone, I would've benefitted from any set of new mounts let alone solid ones. We will see, it's for sure no luxury BMW anymore. ;)

E36 M3 Front Suspension Overhaul Part III: Rebuilt Z3 Steering Rack, New Tie Rods and Universal Joint

So with the subframe all reinforced and installed I turned my attention to my freshly rebuilt Z3 Steering Rack. I picked mine up from the rackdoctor. Make sure you call him about the Z3 rack. He knows what they looks like and they take a couple weeks to procure. They come with a lifetime warranty for $375. He will not accept any other rack as a core.

Removing the rack includes the removal of two bolts through the subframe, tie rods on the end, universal joint on the shaft and the power steering lines. The bentley should have all this information on torques and what not. It's pretty straight forward. Here is my 95 M3 rack next to a 96 1.9L Z3 (TRW) rack. Most BMW racks are made by ZF but the Z3 is a TRW rack.


There is a TON of speculation on the forums about how fast racks actually turn. The only person that knows really what they're talking about is Itsablur on BFc. I can quickly summarize. There are 3 things to measure.

A) The distance in mm the tie rods extend per revolution of the steering gear from the direct center of the rack. This is important for track as you never really go much past 180º revolution from center. The 95 M3 rack for example is progressive and gets more aggressive after 180º degree revolution off center. (This is measured in mm/rev)
B) The overall 360º revolutions of the steering gear between locks. (Turns lock to lock or LTL)
C) The overall distance the tie rods actually travel between locks. (Rack distance LTL)

The information is scattered on BFc but I've measured 3 racks. A lot of info is in this thread. The 1995 M3 rack, a standard e46 rack and the TRW Z3 rack.

95 M3 Rack is progressive and different from 96-99 E36 Rack.

A= 40mm/rev on center. After one 360º revolution on center the rack moves about 50mm/rev on the outside. Which helps for parking.
B= 3.0 Turns LTL
C= 140mm total steering angle

e46 rack is linear (Part # 32 13 6 753 438) Almost the same as 96-99 e36 rack.

A= 46mm/rev anywhere measure on rack.
B= 3.26 Turns LTL
C= 150mm total steering angle

Z3 TRM rack is linear

A= 51-53mm/rev anywhere measured on rack. I couldn't really get a solid 53mm/rev. It was closer to 51-52mm.
B= 2.7 Turns LTL
C= 136mm total steering angle. I believe this is what I got. I remember is was slightly less than the 95 M3 rack.

Alright so that's the school lesson. The numbers are close enough. Within 98% accuracy. The idea is that the Z3 rack has the fastest response on center. The e46 rack looks like a nice rack too with decent on center ratio and a lot of angle for parking if you're on the street a lot. I would say the 95 rack is probably the strangest rack out there, but it is still a huge upgrade over the 4.0 turns LTL e30 rack.

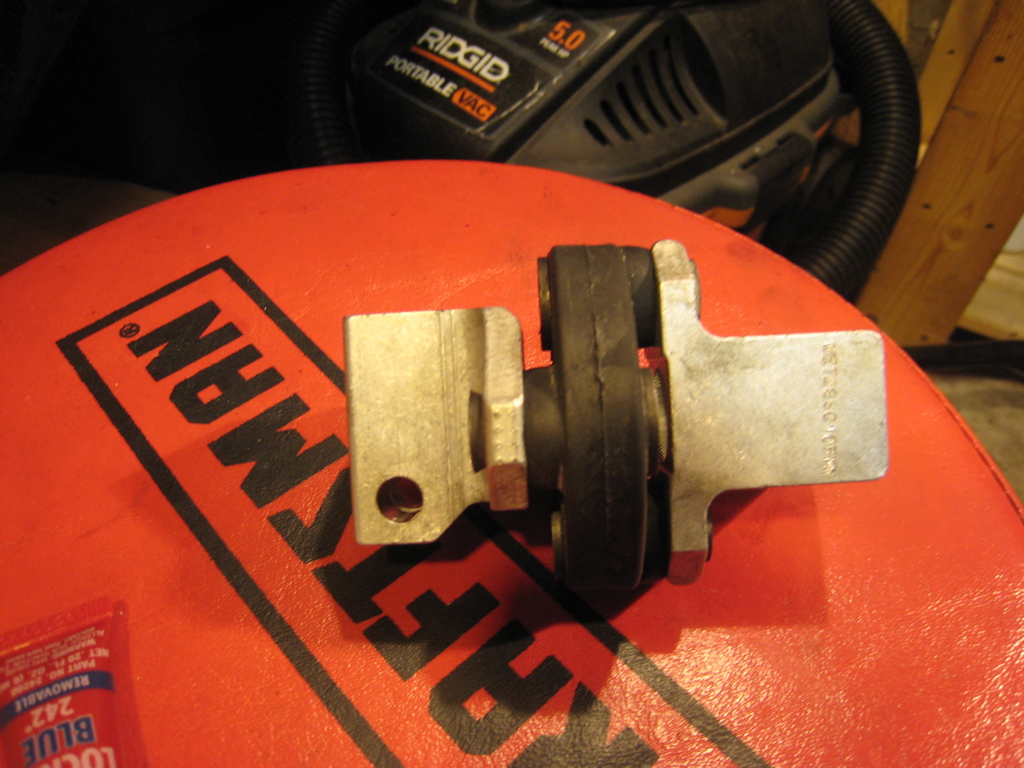
When I installed my new rack I decided to change out the rubber guibo/universal joint on the steering shaft. The old one wasn't torn but it looked kind of beat.


My goal was to refresh any rubber on the front suspension or replace it with a solid mount if available. I tried to keep the steering wheel straight upon removing the old rack and putting in the new one. I calculated about where the z3 rack's center was and measured the distance the tie rods were at from the old rack just to get me in the ball park before I went to get an alignment.


Tie rods were new Lemfoerder e36 m3. I ordered the lock nuts from TheBMWPartStore. Great service, great prices and free shipping over a certain amount.

The Z3 rack is a rolled/stamped steel rack and not cast. The 95 M3 rack as well as others are cast with a threaded boss to secure the power steering cooling line. The Z3 does not have this threaded hole. To secure the "trombone" power steering cooling line that is used on the 95 M3 to the Z3 rack I borrowed another forum member's idea and created a small bracket out of stock aluminum bought from the hardware store.


I used an OE BMW hose clamp which is absolutely necessary. ;)


Torque down the subframe mounts, tie rods and power steering hoses. Remember to use new crush washers for the power steering hoses. I forgot and had to run to the dealer for $2.05 a piece!!

Here's an image of the rack installed. Yay.


After installing the Z3 rack in my car I can say it is much more responsive, but it is not like an F1 car where I can't go past 180 degrees or I'm at full lock. The 95 rack I had in there needed new tie rods so I went for a rebuilt rack. If my rack was fine I'm not sure I would go for the swap. I think the most steering effort is felt from the delrin control arm bushings.

We'll wrap this up with a strut mount swap and x-brace installation.

E36 M3 Front Suspension Overhaul Part II: Subframe Reinforcement and Solid Mounts

The second part of overhauling the front suspension included dropping the subframe to weld in reinforcements and replacement of the motor mounts. To remove the subframe I had to of course remove the steering rack first. After breaking free the tie rod ends from the spindle and loosening the universal joint on the steering shaft there are two more bolts holding the rack to the subframe.

Once the steering rack is out of the way, build an engine hoist out of wood or just put a block of wood on your jack and support the motor from underneath. The subframe is connected with 4 bolts. So like I had previously said in one of my posts I was getting some bothersome knocking noise in the front suspension of my car under hard breaking. After removing the subframe I discovered what this was.


So obviously that is not how it's supposed to look. As the subframe was being lowered both motor mounts fell to the ground. That's odd, I thought. What you see there is the bottom mounting stud of the stock motor mounts completely sheered off. So my motor was being held in by the top mounts and well, gravity. Here's the carnage.


Dear God...So THAT'S what that noise was. I was pretty happy to know that I found out what the issue was and also happy that I was lucky enough to avoid any major catastorphe.

Alright so subframe out ready to be welding. You can buy the reinforcements from VAC, AKG or Turner. They're all the same. The ones I got from AKG don't really fit so we had to grind them down anyway. It's just metal.

First things first prep the area to be welded. I used my buddies MIG welder, and generally MIG can go over more than TIG but just clean off the paint to make your life easier. Here's just some pictures of the non-prepped surface.


So as you can see the plates don't fit perfect right away. Grind them to fit flat. Here is the finished prepped surface ready for welding.

Prepped
Prepped Surface
Reinforcement Tab Installed
I guess now all you have to do is weld those guys in there!


Weld it up as best you can. There are areas that the torch just won't fit in. Once you feel good about the bottom piece put the top pice in place and, per the directions, tack down the edge closer to the center, weld it, then hammer it down to meet up with the outer lip.


And there you have it. Do the same for both sides. If you're going to run solid aluminum mounts I would say this is a necessary reinforcement to do. But even after seeing my stock motor mounts, I would feel more comfortable doing this with any mounts.


Here's the finished piece back on my workbench. I cleaned the shit out of the dirty ass subframe before painting it. I used self-etching primer on the raw metal to prevent rusting and bought a gloss black laquer from the same brand. It was from an automotive paint supply store so each can cost about $10. They spray really nice for a can though! Can't remember the brand but go to an automotive paint store and buy the professional paint in a spray can and it will be nice.


Here are the mounts I used from Turner. 


I masked off the "M3" on the subframe because I'm a dork.


Subframe ready to be installed
While I was under the car I also threw on solid aluminum tranny bushings from Turner. The process is bascially, remove the old ones, put in the new ones. Torque them down once they're loaded up. Not before. But with aluminum, I'm not sure if pre-load would change anything. They're already solid.


The front motor mounts torque to about 16-18ftlbs I believe. Like I said above, with poly or stock you let the engine load up the mounts before you torque them down. So that's about it for the reinforcements and mounts. Next up is some steering rack information.


Tuesday, October 25, 2011

E36 M3 Front Suspension Overhaul Part I: Front Lower Control Arm Ball Joint and Bushing Replacement

So after the last track event, which was years ago it feels like, I was experiencing a scary 'knock' noise in the front suspension upon heavy braking. It felt like it was in the steering or at the very least something part of the front suspension.

I got the car home and have been doing a major overhaul and the front suspension replacing anything and everything down there. I'll do a 3 or 4 part installment of everything I went over. First up is the front control arms.

95 M3 Control Arm
With 150k miles on the chassis I was positive the front control arm ball joints and bushings were shot. I would also assume they are the factory units having bought the car stock from a non-enthusiast. The easiest way to replace these is just order new control arms with the ball joints alrady pressed in. Unfortunately these are about $200 each for Lemfoerder brand control arms. The Meyles are slightly cheaper, but I would only go with the Lemfoerder personally.

I then discovered that you can press out the existing bushings and use Lemfoerder ball joints from the e30 control arms. The topic is covered in this thread here. So for about $25-$30 a ball joint you can replace all 4 for about $120 instead of $400. Also I decided to change my tie rods and sway bar links since they were shot as well.


Removing the control arms is no easy task. First to get more room I removed the sway bar.


Then remove the nuts on the top of the subframe and the other one on the spindle. Keep the lolipop with the control arm bushing attached to the car for now unlike the picture below.


After that I used an arsenal of tools to remove the control arms.


The control arm ball joints have a tappered fit which creates a mechanical weld. You need a pickle fork to break this weld. My ball joints were so stuck I used a torch to heat them up, an impact air hammer with pickle fork adjustment and a 4lb hammer just to get the force I needed to break them up. In the end that wouldn't even work and I ended up using this guy.


All these tools were purchased from harbor freight and, honestly, did the job. When the welds break it will go off like a gunshot. There is no other real DIY for this, it's just removing bolts and brute force. The ball joints themselves had some play in them but they were snug in their homes. I tore the boots upon removing them but the control arm ball joints and tie rods themselves did not look responsible for the knock noise I was experiencing on the track.

Once the arms were both out I took them to my buddy Justin Pawlak's shop Hotline in Gardena. Justin and I grew up in the same town and when he's not busy winning Formula D races I ask him if I can borrow his tools. ;) I didn't bring my camera so I don't really have any pictures of the process. If you look at that thread above you can see you'll need a 20 ton press at the least. That is what I used. Here are the old ball joints pressed out.


Justin, rushing at the time building badass drift cars, pressed in the first set showing me how to work a press and accidentally tore one of the boots. I pressed in the other arm and replaced the torn boot. I couldn't order just the boot so I bought a $11 Meyle ball joint and salvaged the boot from that.


I also decided to use Delrin front control arm bushings. The set I used is the TC Kline/Turner Brand. Since they are offset of the 1995 M3 only they need a set screw so that they won't move. A simple tap and they were set.


So that's about it for the control arms. Up next is subframe reinforcement followed by steering rack swap with new tie rods.