Tuesday, November 29, 2011

E36 M3 Front Suspension Overhaul Part II: Subframe Reinforcement and Solid Mounts

The second part of overhauling the front suspension included dropping the subframe to weld in reinforcements and replacement of the motor mounts. To remove the subframe I had to of course remove the steering rack first. After breaking free the tie rod ends from the spindle and loosening the universal joint on the steering shaft there are two more bolts holding the rack to the subframe.

Once the steering rack is out of the way, build an engine hoist out of wood or just put a block of wood on your jack and support the motor from underneath. The subframe is connected with 4 bolts. So like I had previously said in one of my posts I was getting some bothersome knocking noise in the front suspension of my car under hard breaking. After removing the subframe I discovered what this was.


So obviously that is not how it's supposed to look. As the subframe was being lowered both motor mounts fell to the ground. That's odd, I thought. What you see there is the bottom mounting stud of the stock motor mounts completely sheered off. So my motor was being held in by the top mounts and well, gravity. Here's the carnage.


Dear God...So THAT'S what that noise was. I was pretty happy to know that I found out what the issue was and also happy that I was lucky enough to avoid any major catastorphe.

Alright so subframe out ready to be welding. You can buy the reinforcements from VAC, AKG or Turner. They're all the same. The ones I got from AKG don't really fit so we had to grind them down anyway. It's just metal.

First things first prep the area to be welded. I used my buddies MIG welder, and generally MIG can go over more than TIG but just clean off the paint to make your life easier. Here's just some pictures of the non-prepped surface.


So as you can see the plates don't fit perfect right away. Grind them to fit flat. Here is the finished prepped surface ready for welding.

Prepped
Prepped Surface
Reinforcement Tab Installed
I guess now all you have to do is weld those guys in there!


Weld it up as best you can. There are areas that the torch just won't fit in. Once you feel good about the bottom piece put the top pice in place and, per the directions, tack down the edge closer to the center, weld it, then hammer it down to meet up with the outer lip.


And there you have it. Do the same for both sides. If you're going to run solid aluminum mounts I would say this is a necessary reinforcement to do. But even after seeing my stock motor mounts, I would feel more comfortable doing this with any mounts.


Here's the finished piece back on my workbench. I cleaned the shit out of the dirty ass subframe before painting it. I used self-etching primer on the raw metal to prevent rusting and bought a gloss black laquer from the same brand. It was from an automotive paint supply store so each can cost about $10. They spray really nice for a can though! Can't remember the brand but go to an automotive paint store and buy the professional paint in a spray can and it will be nice.


Here are the mounts I used from Turner. 


I masked off the "M3" on the subframe because I'm a dork.


Subframe ready to be installed
While I was under the car I also threw on solid aluminum tranny bushings from Turner. The process is bascially, remove the old ones, put in the new ones. Torque them down once they're loaded up. Not before. But with aluminum, I'm not sure if pre-load would change anything. They're already solid.


The front motor mounts torque to about 16-18ftlbs I believe. Like I said above, with poly or stock you let the engine load up the mounts before you torque them down. So that's about it for the reinforcements and mounts. Next up is some steering rack information.


Tuesday, October 25, 2011

E36 M3 Front Suspension Overhaul Part I: Front Lower Control Arm Ball Joint and Bushing Replacement

So after the last track event, which was years ago it feels like, I was experiencing a scary 'knock' noise in the front suspension upon heavy braking. It felt like it was in the steering or at the very least something part of the front suspension.

I got the car home and have been doing a major overhaul and the front suspension replacing anything and everything down there. I'll do a 3 or 4 part installment of everything I went over. First up is the front control arms.

95 M3 Control Arm
With 150k miles on the chassis I was positive the front control arm ball joints and bushings were shot. I would also assume they are the factory units having bought the car stock from a non-enthusiast. The easiest way to replace these is just order new control arms with the ball joints alrady pressed in. Unfortunately these are about $200 each for Lemfoerder brand control arms. The Meyles are slightly cheaper, but I would only go with the Lemfoerder personally.

I then discovered that you can press out the existing bushings and use Lemfoerder ball joints from the e30 control arms. The topic is covered in this thread here. So for about $25-$30 a ball joint you can replace all 4 for about $120 instead of $400. Also I decided to change my tie rods and sway bar links since they were shot as well.


Removing the control arms is no easy task. First to get more room I removed the sway bar.


Then remove the nuts on the top of the subframe and the other one on the spindle. Keep the lolipop with the control arm bushing attached to the car for now unlike the picture below.


After that I used an arsenal of tools to remove the control arms.


The control arm ball joints have a tappered fit which creates a mechanical weld. You need a pickle fork to break this weld. My ball joints were so stuck I used a torch to heat them up, an impact air hammer with pickle fork adjustment and a 4lb hammer just to get the force I needed to break them up. In the end that wouldn't even work and I ended up using this guy.


All these tools were purchased from harbor freight and, honestly, did the job. When the welds break it will go off like a gunshot. There is no other real DIY for this, it's just removing bolts and brute force. The ball joints themselves had some play in them but they were snug in their homes. I tore the boots upon removing them but the control arm ball joints and tie rods themselves did not look responsible for the knock noise I was experiencing on the track.

Once the arms were both out I took them to my buddy Justin Pawlak's shop Hotline in Gardena. Justin and I grew up in the same town and when he's not busy winning Formula D races I ask him if I can borrow his tools. ;) I didn't bring my camera so I don't really have any pictures of the process. If you look at that thread above you can see you'll need a 20 ton press at the least. That is what I used. Here are the old ball joints pressed out.


Justin, rushing at the time building badass drift cars, pressed in the first set showing me how to work a press and accidentally tore one of the boots. I pressed in the other arm and replaced the torn boot. I couldn't order just the boot so I bought a $11 Meyle ball joint and salvaged the boot from that.


I also decided to use Delrin front control arm bushings. The set I used is the TC Kline/Turner Brand. Since they are offset of the 1995 M3 only they need a set screw so that they won't move. A simple tap and they were set.


So that's about it for the control arms. Up next is subframe reinforcement followed by steering rack swap with new tie rods.

Monday, August 29, 2011

E46 Rear Shock Replacement Michigan Car

So I had the pleasure of helping my buddy replace his blown out rear shocks on his e46 323ci. Having come out from Michigan I knew we were in for a couple surprises, luckily nothing that couldn't be remedied.


The lower shock bolt was slightly rusty but nothing too terrible that I hadn't already been through with my own experience on Michigan cars. It came free with a blast from the impact wrench. The area I was more worried about where the shock towers and they were clean as a whistle. The same could not be said about the factory shocks.


This is what a happy Indian man looks like knowing his car will soon handle again.


Ohhh yeah, how I don't miss that. Here's a nice side by side of the replacement Bilstein Sports.


We ran into a little snafu with the shock plates that hold everything together. They had take a beating as well. We figured it would be pretty stupid to put the old rusty plates on the new shocks so we headed off to the only BMW dealership that was open which had the plates in stock. After a $38 ass rape later for some little metal washers, essentially, we were back to finish the install.


If you're reading this wondering how to install your shocks, it's simple. Pull back the carpet in the trunk. Release the lower bolt but put something under the tire so the suspension doesn't completely fly around. Take the two lock collar bolts off the top that mount to the body and you're done. Put the new shock mounts on shock by holding the shock with some pliers and tightening the nut down to 10ftlbs. Which is just slightly tight.


Don't forget the reinforcement plates which can be ordered from just about anywhere including BMA Parts where Mathew bought these. We had to put the rear shock mounts in first then the shock, but however way works for you just use a new locking nut on the top. Torque the body mount nuts down to 17 ftlbs and the bottom bolt to 57 ftlbs. 

We went with the Meyle HD shock mounts which I'm running on my e36 and have been happy so far. The JT Design or after market rubber bushing styles clunk from what I've seen. Here's a picture of the factory shock about the shear off at the top.


Not only were they rusty blown out and destroyed but they were leaking too.


Phew, just happy to see those out of there, as well as help another fellow enthusiast out. I guess it's on to the fronts next!

E28 New Windshield Safelite Auto Glass

Date: 8/05/11

So it was time to fix the multiple cracks in the windshield. I have had good luck in the past with Safelite and chose to use them again.


I think the original cost is somewhere around $450, but I used my comprehensive claim to take care of it which was much less. The only difference between the OG glass and the Safelite glass is that the replacement glass has a green strip on the top. It didn't seem to be much different and kind of fit the 80s 'ness of the car.


Yippe! All done. No more staring through bullet holes. One piece at a time, one piece at a time.

Monday, August 8, 2011

Track Day: Speed Trials Streets at Willow Night Session 7/23/2011

Date: 7/23/11


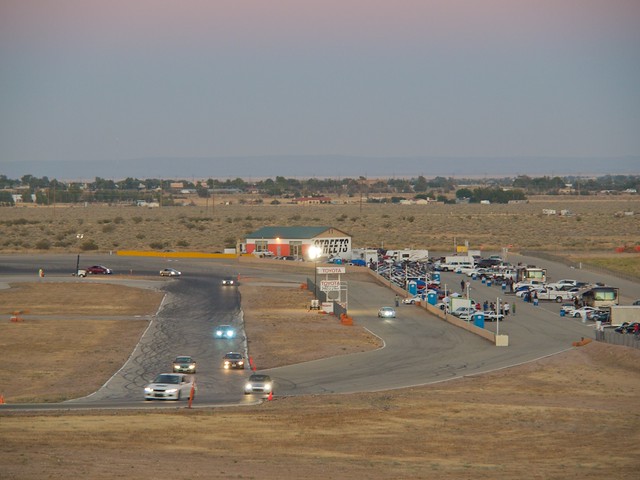
So with the new wheels mounted it was way overdue for a track day. The was the first one of the year for me. I had signed up for Buttonwillow next week with Speed Ventures but I caught wind of a night event with Speed Trials from a friend. I figured, when was the next chance to run at night ever going to come around again? I jumped on the last minute opportunity and signed up the day before. I took the pic above from a collection of photos off Speed Trials website. My car is the one with the missing fog light on the driver's side. :P

Check out these awesome photos taken from the event website. SpeedTrialUSA 7/23/11 Streets of Willow Night Event

The track the event was being held at was the smaller course at Willow Springs called Streets of Willow. It was about 95 degrees outside. I got there around 2pm to setup shop. I was one of the only guys with a pop-up tent. Lucky me.


Because of my shade I met quite a few people trying to stay cool. One of them being a nice guy who owned 5 Ferrari's and was tracking his 550 Maranello. Yeah....he was super cool though. Really friendly and helped me out a few times. A few of the other guys I met were a pair of s2000s down from San Jose. We ran neck and neck with each other throughout the day.


So a little information about the track. It is the smaller track that is at Willow Springs. I'm a huge fan of Big Willow and wasn't too thrilled about streets, but the opportunity to run at night was too much to pass up. I also figured since I had never ran there, I might as well check it out.

It's basically a large autocross course. Here is the layout.


My car was just a little too big or just not setup correctly for this course. A lot of lower speed technical corners that I just under-steered through. Turns 1 and 10 ended up being my favorite corners when you could actually carry some speed and feel the car grip. My best time of the day was a 1:34:xx.

We ran three sessions during the day to get us used to the track. The fourth session was really beautiful right at sunset. I don't have any on track shots but here are some more of the paddock.


As nightfall fell things got a little scary. You couldn't see shit. You had to just rely on what you remembered from the day sessions. I pulled it back for the 5th session and just enjoyed the fact that I was running at night.


For the 6th and final session I did what I always say not to. That was to run full 10/10ths on the last session of the day when you're all super tired and not making the best decisions. The s2000 boys and myself were really pushing it. I was carrying maybe 90 or so into turn 1 like I had been doing all day. Unfortunately this time I wasn't straight when I started braking and the rear flew around on me. I tried to save it to no avail and spun off. Here's an idea of the lighting on the track.


The car didn't like that too much, kind of shut down giving me check engine lights and what not. I limped it back to the pits and that was that for the night. 

My overall impressions of streets is that I got whopped by Honda's. FWD Honda's. It's a course that requires you set your car up completely different from the higher speed courses. It's technical with the majority of corners being more low speed. I wasn't really prepared for it but had a great time anyway. I think it is "less dangerous" type of course and great for those who have never been out on track before.


After a long day my tires were thrashed, and my car a little shaken up. I got it home and it was leaking coolant from the radiator and a little P/S fluid. Just Battle wounds. Time to clean her up.